If you want to use AI directly inside Obsidian, you don't need to build custom scripts or write code. With a dedicated AI community plugin and an API key from your preferred AI provider, you can turn your static vault into an interactive, context-aware knowledge assistant in less than five minutes.
Connecting an AI model via an API key allows you to summarize research papers, draft daily notes, brainstorm project ideas, and extract semantic connections across your vault using frontier cloud models like OpenAI GPT-4o, Anthropic Claude 3.5 Sonnet, and Google Gemini 2.0.
In this step-by-step guide, we'll use Copilot for Obsidian as our primary example - one of the most polished and versatile AI extensions available in the Obsidian ecosystem.
What You Need
Before starting the setup process, ensure you have the following prerequisites ready:
- Obsidian Installed: Desktop or mobile app (v1.4.0 or higher recommended).
- An Active Vault: A vault containing your notes, project files, or daily journals.
- An API Key: Obtained from OpenAI, Anthropic, Google AI Studio, or OpenRouter.
- The Copilot Plugin: Installed directly from Obsidian's Community Plugins browser.
Recommended Plugin: Copilot for Obsidian
Copilot
✓ CommunityAn AI assistant for Obsidian. Chat with GPT-4, Claude, and local LLMs directly in your vault. Summarize notes, generate content, and ask questions about your knowledge base.
- ✓Chat directly with your Obsidian vault notes
- ✓Rewrite, expand, or summarize text in place
- ✓Use AI agents, custom prompt templates, and local models
Copilot for Obsidian acts as an intelligent bridge between your local Markdown files and external LLM APIs. It provides a sleek side-panel chat interface, note context inclusion, long-term memory options, and customizable prompt templates.
1. Install Copilot in Obsidian
To install Copilot, follow standard community plugin installation steps:
- Open Obsidian and navigate to Settings → Community plugins.
- If Restricted mode is enabled, click Turn on community plugins.
- Click Browse to open the Community Plugins directory.
- Type Copilot into the search bar.
- Select Copilot by Logan Yang from the search results, click Install, and then click Enable.
If you haven't installed community plugins before, check out our comprehensive guide on how to install local and community plugins in Obsidian.
Once enabled, a new Copilot icon will appear in your ribbon bar, and the plugin settings tab will be available under your Obsidian settings panel.
2. Add Your API Key
To authorize Copilot to communicate with your AI provider, you must paste your API key into Copilot's configuration menu.
- Open Settings → Copilot → General.
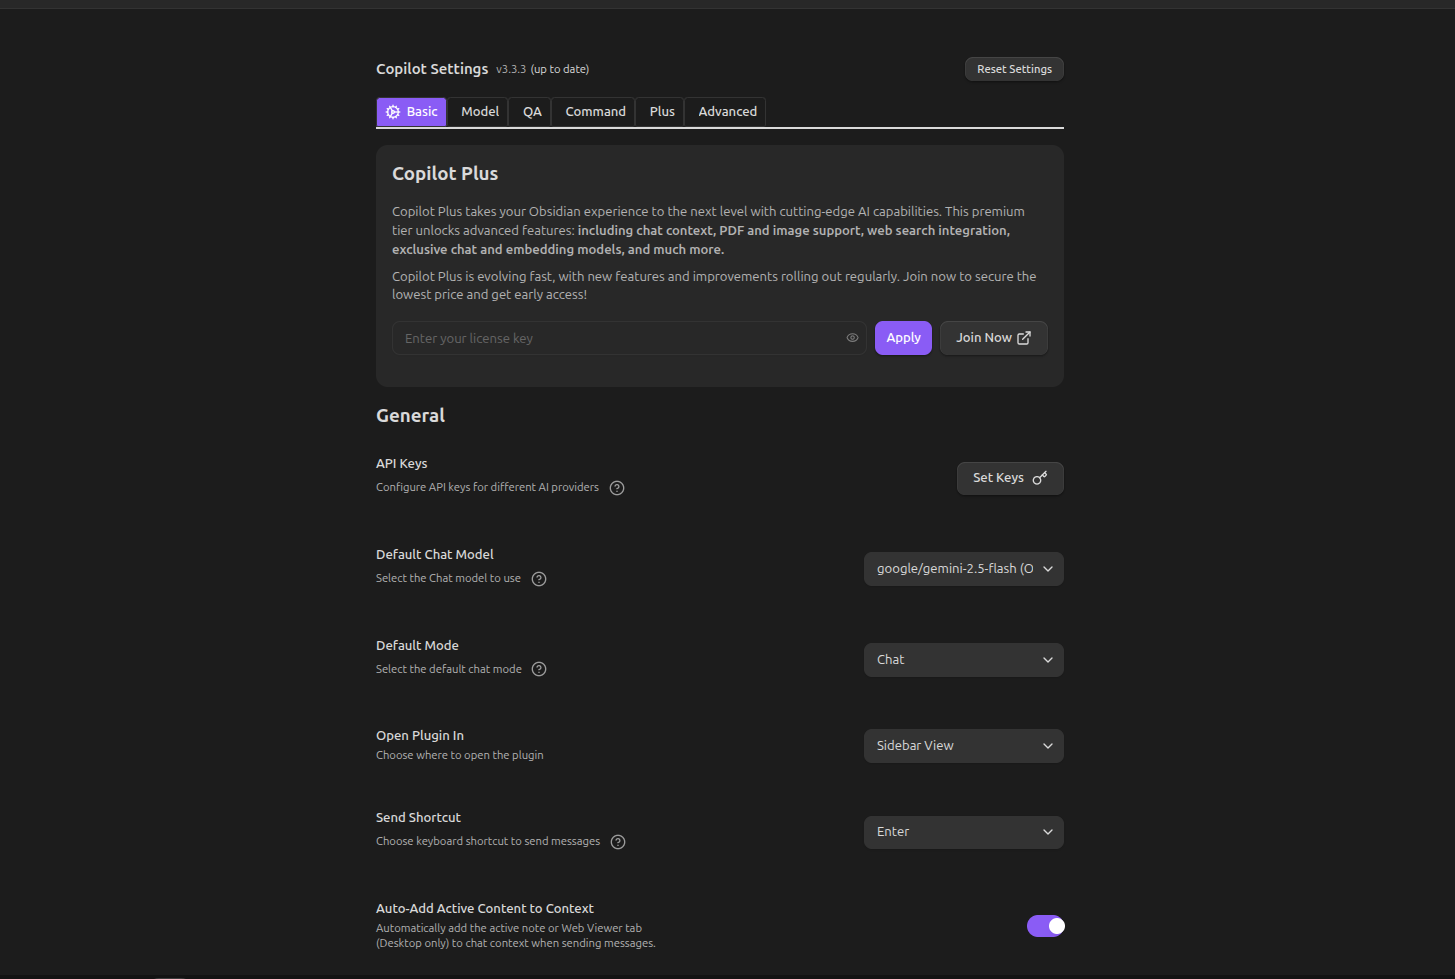
- Under the General settings section, locate the Set Keys button.
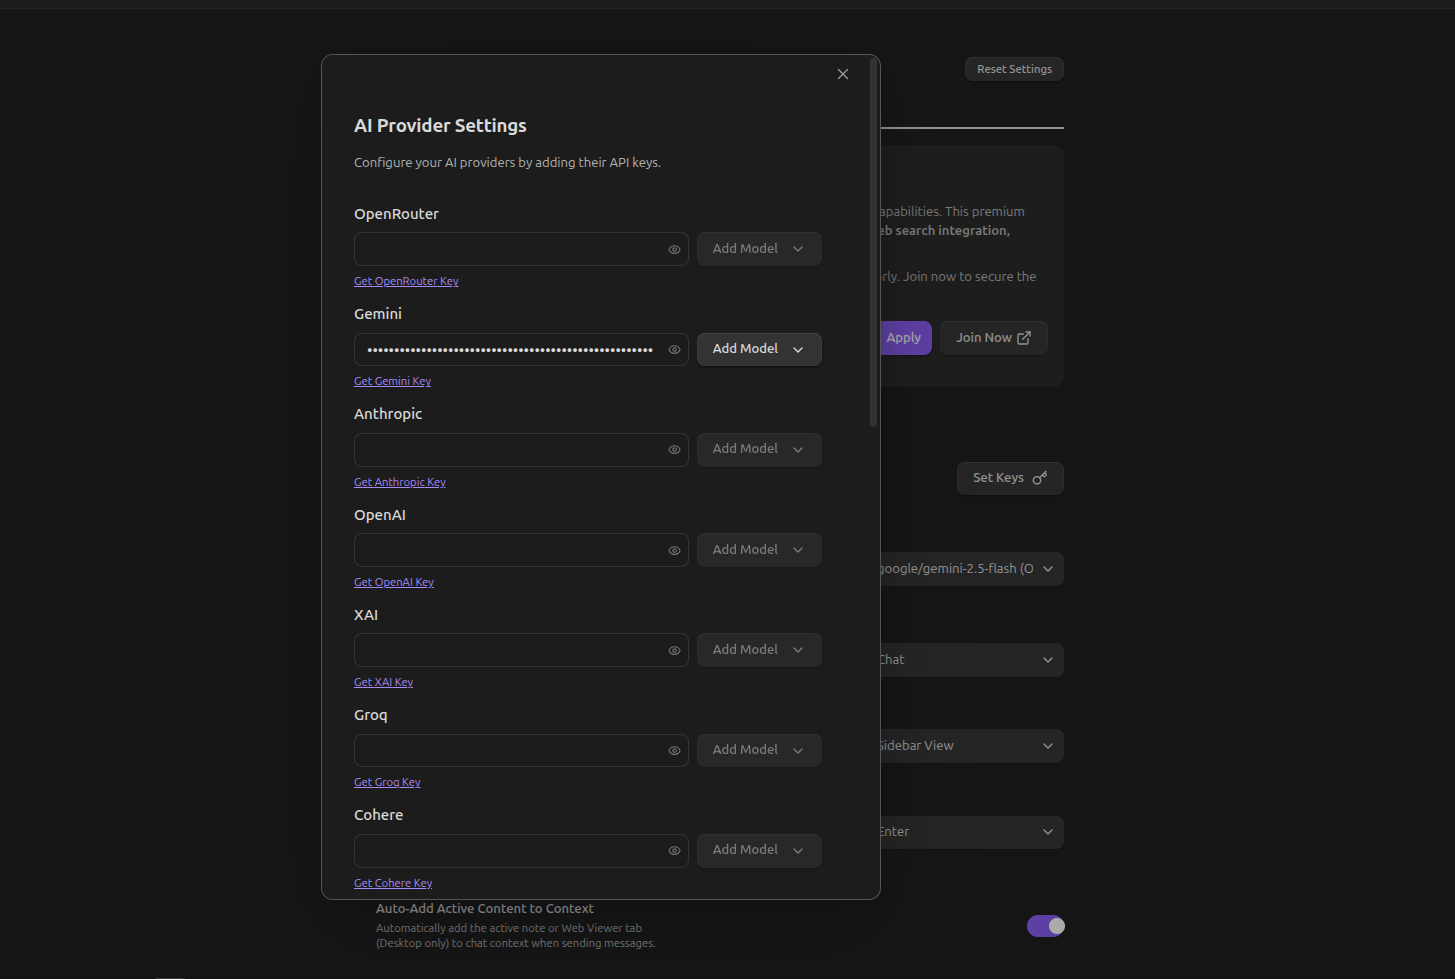
- Click Set Keys to open the API key input overlay.
- Select your preferred AI provider tab (e.g., OpenAI, Anthropic, Gemini, or OpenRouter) and paste your official API key into the corresponding input field.
- Click Save or close the dialog to store your credential.
Where to Get Your API Keys
You aren't limited to a single AI provider. Copilot allows you to configure multiple provider keys simultaneously so you can switch models on the fly:
- OpenAI API Key: Generate a key in the OpenAI Platform Dashboard.
- Anthropic Claude API Key: Create a key in the Anthropic Console.
- Google Gemini API Key: Grab a free-tier or pay-as-you-go key from Google AI Studio.
- OpenRouter API Key: Obtain a unified key from OpenRouter to access over 100 open and proprietary models through a single API.
3. Choose Your Default Model & Fine-Tune Settings
After saving your API key, return to the Settings → Copilot page to configure your execution preferences:
- Default Chat Model: Select the primary model you want Copilot to invoke during chat sessions (e.g.,
gpt-4o,claude-3-5-sonnet-20241022, orgemini-1.5-pro). - Temperature Setting: Adjust creativity levels. A lower temperature (
0.2–0.3) produces precise, deterministic answers ideal for factual note retrieval, while a higher temperature (0.7–0.8) works best for creative drafting. - System Prompt Customization: You can supply custom instruction rules to dictate how the AI formats its responses inside Obsidian.
Here is an example custom system prompt tailored for Obsidian knowledge management:
system_prompt: |
  You are an expert knowledge assistant embedded inside an Obsidian vault.
  - Format all structural output using valid GitHub Flavored Markdown.
  - When referencing topics mentioned in user notes, use standard [[WikiLinks]].
  - Keep responses concise, objective, and directly actionable.
  - Prefer bullet points and short paragraphs over long text walls.
4. Chat With Your Notes
With Copilot configured, open the chat workspace by clicking the Copilot icon in the left ribbon or running Ctrl+P / Cmd+P → Copilot: Toggle Chat Window.
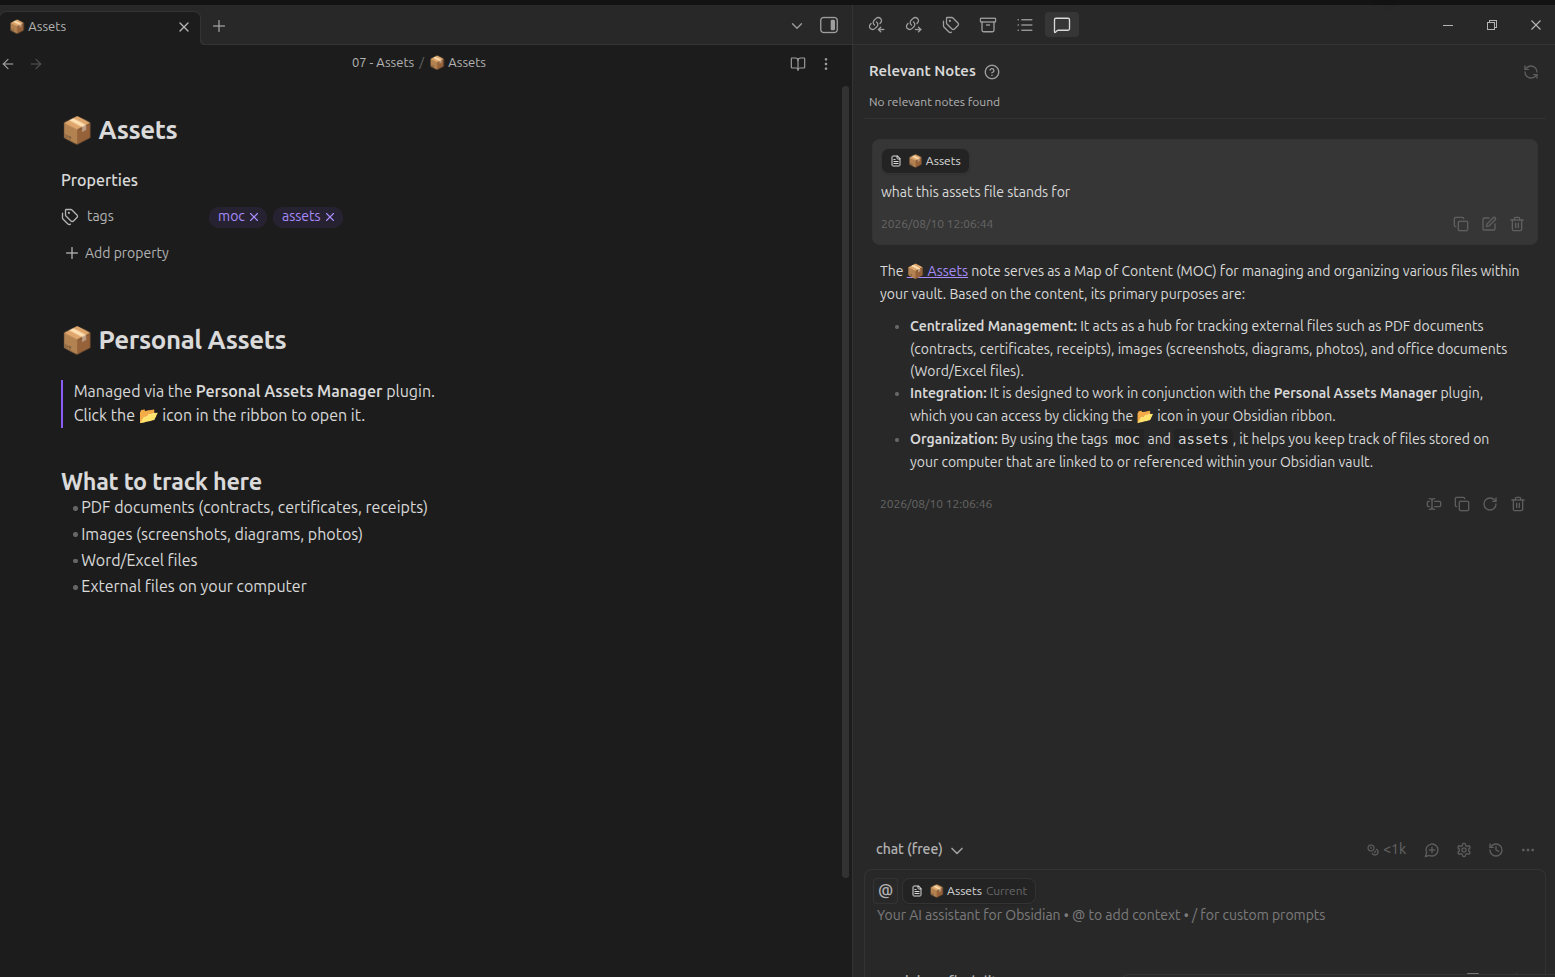
You can now ask questions about your active note or attach context from across your vault. Copilot reads the text of your opened file and feeds it to the AI model alongside your prompt.
Practical Prompts to Try in Your Vault
- Note Summarization:
> "Summarize the key arguments and actionable takeaways from this note in 5 bullet points."
- Concept Clarification:
> "Explain the core technical concepts in this note as if I were explaining them to a beginner."
- Action Item Extraction:
> "Scan this meeting note and extract all tasks, assigned owners, and upcoming deadlines."
- Knowledge Synthesis:
> "What are the main thematic connections between this note and my active project strategy?"
- Content Generation:
> "Draft an outline for a blog post based on the notes and references in this active document."
How It Works Under the Hood
When you ask Copilot a question, the data flows securely through a straightforward pipeline:
┌─────────────────┐      ┌─────────────────┐      ┌─────────────────┐      ┌─────────────────┐
│  Obsidian Note  │ ───► │ Copilot Plugin  │ ───► │ AI Provider API │ ───► │  Response Back  │
│  (Active Text)  │      │ (Appends Prompt)│      │(OpenAI/Claude/  │      │  to Side Panel  │
│                 │      │                 │      │    Gemini)      │      │                 │
└─────────────────┘      └─────────────────┘      └─────────────────┘      └─────────────────┘
Your API key provides Copilot with encrypted bearer authorization to send HTTP requests to the selected provider's endpoint. Copilot bundles your note text as contextual prompt context so the AI model can return answers grounded in your own knowledge base.
Feature & Performance Matrix: API Keys vs. Local AI
While API key integrations offer immediate high-intelligence access, running AI locally using tools like Ollama is an attractive alternative for offline-first users.
If keeping your vault data 100% offline and free of cloud subscriptions is your top priority, explore our step-by-step guide to setting up Ollama and local LLMs in Obsidian. If you want to compare top extensions, see our roundup of the 7 Must-Have Obsidian Plugins for 2026.
Pro Tips & Troubleshooting Common Issues
1. Fix 401 Unauthorized Errors
If Copilot returns a 401 Unauthorized status message, your API key was typed incorrectly, contains extra whitespace, or lacks an active billing setup on your AI provider account. Double-check your key in Settings → Copilot → Set Keys.
2. Manage Token Context Limits
Sending massive notes (over 50,000 words) can exceed context window boundaries or generate unexpected API fees. Use Copilot's selection-only mode (Chat with Selected Text) to send specific note sections rather than your entire document.
3. Set Spending Caps
In your OpenAI or Anthropic developer console, set hard monthly budget limits (e.g., $5.00/month). This prevents runaway costs if you run high-volume semantic queries or automated vault scripts.
Frequently Asked Questions (FAQ)
Is my vault data used to train AI models?
Standard paid API usage from OpenAI, Anthropic, and Google Cloud API is governed by enterprise privacy terms that explicitly prohibit using customer API inputs for model training. However, always review your provider's current data privacy terms.
Can I use Copilot on Obsidian Mobile?
Yes! Copilot is fully compatible with Obsidian Mobile for iOS and Android. Simply configure your API key in the mobile settings panel.
Which model offers the best balance of speed and cost?
For everyday note chatting and summarization, OpenAI GPT-4o-mini and Claude 3.5 Haiku deliver lightning-fast responses at negligible cost (fraction of a cent per query). For complex reasoning or long-form synthesis, switch to Claude 3.5 Sonnet or GPT-4o.
Can Copilot index my entire vault using RAG?
Yes. Copilot includes built-in indexing options that generate local embeddings for your notes, allowing you to run vector similarity searches and chat with your full knowledge base.
What is the difference between Copilot and Smart Connections?
Copilot focuses primarily on interactive chat, quick note actions, and multi-model flexibility. Smart Connections emphasizes automatic semantic note links, embedding visualization, and background note relationships.